Friday, December 07, 2012

The Anti-Bucket List

Hubby and I were watching comedian John Pinette on TV the a little while ago; he had a brilliant idea that I thought I would share with you all, because I am in love with it.

He called it his Anti-Bucket List – or his F*&k-it List!
This is a list you keep of all the things you never want to do in your life.

I honestly can’t remember what his was, probably an extreme sport or something, but I laughed and love this list.

Fast forward a few days later and Hubby and I are watching the news.  There was story about a woman who was walking across Antarctica; I turned to hubby and instantly said – “That is on my F*&k-it List!”

Another thing on my list is climbing a mountain.  I don’t mean one of those hills they have in Ontario they call a mountain – I mean I never want to have to use ropes, carabiners or any special equipment to climb up a hill let alone a mountain.

Yup, not for me thanks!

I admire anyone that does want to do these things, but they are just not ever going to be on my must do bucket list.

What about you?  What is on your ‘I have no desire what-so-ever to do it’ list?  Or F*&k-it List as I like to call it.

Monday, December 03, 2012

Nuts and Bolts

Isn’t it funny how the things you did as a child at Christmas often dictate what traditions you do as an adult too?

My Mom used to make Nuts & Bolts every Christmas, and although I haven’t made them for a few year, this year I knew I needed them.
 
I posted a picture on Facebook and Instagram (MrsJennyHill if you'd like to follow me) on Saturday and very soon after I had a few requests for my recipe.

So here you go:  it is in my opinion the perfect balance, not too much sauce, but with enough flavour to bring back a million Christmas memories.


Nuts & Bolts

1 box Shreddies (550g)
1 box Cherrios (500g)
1 box Crispix (350g)
1 package pretzels (400g)
1 package roasted & salted peanuts (600g)
Additional nuts if you want

2 cups butter
1 cup Worcestershire sauce
7 garlic cloves, pressed
2 teaspoons salt
2 teaspoons onion powder
5 dashes Tabasco sauce

Preheat oven to 250 F.
Using a few large bowls, mix the Shreddies, Cherrios, Crispix, pretzels and peanuts until evenly combined.
Melt the butter in a sauce pan.  Once melted, add the Worcestershire sauce, salt, onion powder and Tabasco sauce.  Mix until well combined and salt is dissolved.
Pour on to cereal mixture and stir well to coat.
Spread into large roasting pans and bake for 2 hours, stirring every 30 minutes.
Once cooled store in Ziplok bags or air tight containers in the freezer.

Enjoy!

Thursday, November 29, 2012

Rainbow Cupcakes and a Birthday

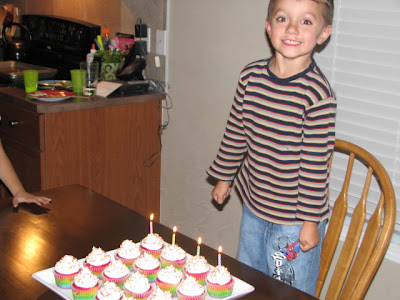
In my blogging absence I missed sharing with you all Little Boy’s birthday.  He is now 4!
We kept it simple this year and just had family over for dinner and cake.


He asked for a rainbow cake, so off I go to Google and Pinterest stalk I went.  I came across this recipe and made a few changes, the main one being cupcakes instead of a cake.


The kids both LOVED these and now I am making rainbow cupcakes for Little Girls birthday too.

These are actually just a white cake, you can cheat and use a box mix but that is like swearing in my house – I am a firm believer of cake from scratch vs. cake from box.

 
Rainbow Cupcakes 
These are a bit painstaking to make, but it's worth it. Everyone loves them (young and old), but I am not saying anyone in particular is old.3 cups all-purpose flour
4 teaspoons baking powder
½ teaspoon salt
1 cup unsalted butter, room temperature
2 1/3 cups white sugar
3 large eggs
2 teaspoons vanilla extract
1 ½ cups milk

Preheat oven to 350 F.
Line 24 cupcake tins with papers, set aside.

Mix together the flour, baking powder and salt in a bowl, set aside.
Using a stand mixer with the paddle attachment, cream together the butter and sugar until light and fluffy.  Add the eggs one at a time, then the vanilla and mix until well incorporated.   Add the flour and milk in alternating additions, beginning with the flour and ending with the milk.  Mix until well combined, scraping down the sides as needed.

Divide the cake batter evenly between 6 bowls.
Add food colouring and then spoon 1-2 tablespoons of each colour into the cupcake tins, spreading out each colour evenly as much as possible.

Rainbow food colouring chart: (I used the cheap food colouring you can buy in the grocery store for this and it worked great.)
  • Purple: 9 red and 6 blue drops
  • Blue: 12 drops
  • Green: 12 drops
  • Yellow: 12 drops
  • Orange: 12 yellow and 4 red drops
  • Red: 18 drops
Bake for 20-25 minutes until cake tester comes out clean.

Once cooled ice with your favourite icing.  My first batch (the one pictured) I used a cooked icing – it tastes great but is a bitch to work with in a piping bag, I strongly recommend a nice butter cream, much easier to work with and pipe.

Yield: 24 cupcakes.
Enjoy!

Friday, November 02, 2012

Kindergarten Photos

"Wow, your daughter looks so much like you!"
I hear this statement a lot!!

So I thought I would show you all - side-by-side - here is my Kindergarten photo with her Kindergarten photo.


What do you think?  Do we look a like?

Thursday, November 01, 2012

Spiderman & Barbie

Happy Halloween! 
Or should I say happy candy hangover day!

We had a great Halloween this year, there was snow on the ground and it was cold, but we live in Canada, we are tough and this is what memories are made of.


This kids are well layered under their costumes - 3 layers each!  And they did great.  Lasted way longer than I thought they would last - I was prepared to bring them home to warm up and then go back out, but after they warmed up they wanted to go and see Anna (out old day home lady).  So I threw them in the van and off we went for a little Halloween visit.

Over all a great night - lots of kids still in our neighborhood in spite of the weather.  How was your Halloween?  Lots of kids?

Friday, October 19, 2012

Conversation with a 3 Year Old

A few weeks ago Hubby was out of town, I was in the kitchen making the kids breakfast, they were watching TV (whatever, don’t judge me – we all do it).

Little boy goes to the washroom where I assume he pees, then comes out.
 

Little Boy: MOM, I HAVE THE BIGGEST PENIS EVER!!!

Me: (oh dear god, what do I say?)
-          Congratulations, you’ll be very happy 10-12 years from now.
-          Ignore him and maybe this will never get said in the grocery store?
But thankfully Little Girl came to my rescue.

Little Girl: No you don’t, Daddy does.


Tuesday, October 09, 2012

Salted Pecan Pie Bars

I have no idea why I do this not just to myself but to you my readers too?  Why was I gone for a month?
Honestly it felt like I was gone for maybe 2 weeks at the most, time has gone into warp speed and the blog was one of the casualties.

I have been busy with Little Girl getting used to school (and me for that matter since I volunteered to be her class’ Room Mom).
Work has been busy and we have just generally been busy trying to take advantage of the last few days of our fantastic fall weather before winter and snow hit us.

Anyway, it was our anniversary this past weekend, so because I love my husband dearly and know him very well, I made him Salted Pecan Pie Bars and gave him the entire tray.  I know pathetic – but he loves them and is food really not flowers for men?

So recipe follows, this is a Pinterest find and the original (found here) actually had maple syrup in it and I did make them that way but you can’t taste the maple at all – so I have left it out of the recipe (you can thank me for saving you some maple syrup for your pancakes).


Salted Pecan Pie Bars

1 cup butter, softened
1 cup packed brown sugar
2 cups flour
2 large eggs
¾ cup corn syrup
¾ cup packed brown sugar
1 teaspoon vanilla
2 cups pecan halves
½ - 1 tablespoon coarse sea salt

Preheat oven to 375F.
Spray a 9x13 pan with cooking spray.
Using a stand mixer, cream the butter and brown sugar until combined, add in the flour and beat until crumbly.  Press into your prepared pan and bake for 12-15 minutes or until the top appears dry – you don’t want to overcook it.

While the crust is cooking, mix together the eggs, corn syrup, brown sugar and vanilla.  Stir in the pecans and pour over the cooked crust.
Spread out evenly making sure the pecans cover the entire thing.
Return to oven and cook for an additional 15-20 minutes.  Remove from oven when the filling appears mostly set.
Sprinkle with coarse sea salt.

Cool completely in the fridge before cutting.

Enjoy!

2005

2012

Tuesday, September 11, 2012

Chicken Vesuvio

The other day I pulled out a couple of chicken breasts from the freezer before going to work and then came home without a dinner plan.  Sound familiar?

So a quick look through Giada De Laurentiis’ cookbook and I found this little gem.

Have I ever mentioned how much I love one-dish meals?  Love, love, love them!  I could have used a few more veggies in this one and although it could work with a few roasted red peppers, I like it as is.  Next time I will serve a plate of fresh veggies or a salad on the side maybe…. maybe….

 
Chicken Vesuvio

3 tablespoons olive oil
2-4 boneless, skinless chicken breasts
Salt & freshly ground black pepper
1 ½ pounds small potatoes, halved
6 large garlic cloves, roughly chopped
¾ cup white wine
¾ cup chicken broth
1 ½ teaspoons dried oregano
¾ teaspoon dried rosemary, or 1 ½ teaspoons fresh, minced
1 can artichoke hearts, drained and roughly chopped
2 tablespoons butter

Preheat oven to 450 F.
Heat oil in a large Dutch oven (or a large skillet or pot that has a lid and can go into the oven) over medium-high heat.
Sprinkle chicken with salt and pepper on both sides.
Brown the chicken pieces on both sides, you might have to work in batches depending on how much chicken you are using and how large your pot is – you don’t want to over crowd them though otherwise they will not brown nicely.

Once chicken is browned (4-5 minutes / side), remove from pot and set aside.
Add more oil if needed; add potatoes to the pot, stir to coat and cook for about 10 minutes until they are golden brown, stirring occasionally.
Add the garlic to the potatoes and sauté about 1 minute, then add the wine and broth, scraping up any grown bits on the bottom of the pot.  Add the oregano and rosemary bring to a boil and then return the chicken to the pot. 

Cover the pot, place in the oven and bake for 15 minutes.  Check the doneness of the chicken pieces and potatoes, you might have to remove the chicken and set aside and continue cooking the potatoes an additional 5 minutes.

Once the potatoes are done, spoon them on top of the chicken pieces and cover with foil.  Return the pot to the stove on medium-high heat; add in the artichokes and butter.  Stir until the butter has melted, the artichokes are hot and the sauce starts to thicken slightly – about 5 minutes.
Spoon sauce over top of potatoes and chicken and serve.

Enjoy!

Yield: Depending on how many pieces of chicken you use – this will serve 2-4 people. 

Monday, September 10, 2012

On My Nightstand - The Paris Wife


The Paris Wife by Paula McLain

Book Summary (source):
A deeply evocative story of ambition and betrayal, The Paris Wife captures a remarkable period of time—Paris in the twenties—and an extraordinary love affair between two unforgettable people: Ernest Hemingway and his wife Hadley.

In Chicago in 1920, Hadley Richardson is a quiet twenty-eight-year-old who has all but given up on love and happiness—until she meets Ernest Hemingway and finds herself captivated by his good looks, intensity, and passionate desire to write. Following a whirlwind courtship and wedding, the pair set sail for Paris, where they become the golden couple in a lively and volatile group of expatriates that includes Gertrude Stein, Ezra Pound, and F. Scott and Zelda Fitzgerald.

But the hard-drinking and fast-living café life does not celebrate traditional notions of family and monogamy. As Hadley struggles with jealousy and self-doubt and Ernest wrestles with his burgeoning writing career, they must confront a deception that could prove the undoing of one of the great romances in literary history

My thoughts:
I kept seeing this book come up in my recommended reads (you know from Chapters on line) and after reading the book description, I quickly knew this book was not something I was interested in.

And then it gets picked for book club, so I borrowed it from the library, did not read the description again and started reading it.
I was instantly drawn in and had a hard time putting this book down and actually had to Google Earnest Hemmingway to learn more about him because I was so drawn into the story and fascinated.

Trust me – this book is fantastic!

My rating: 5 out of 5!

Friday, September 07, 2012

First Day of Kindergarten

So here is where I shamelessly show off pictures of Little Girl from her first day of Kindergarten.

Trust me, you are lucky, if you worked with me, you would have had to already endure me pulling out my iPhone and showing you my pictures and waiting for the required awwwwwww.


I dropped her off at her dayhome; she took the bus (along with all the other kids from the dayhome) and then I drove to the school and waited for her to arrive.

I wish I had gotten a picture of her on the bus and although I could have given my camera to the dayhome lady, I didn't want to stress Little Girl out more than I already feared she was stressing.

She was beyond excited and only showed some of her nervousness while we were lined up waiting for the bell to ring, but she didn't cry and went happily into the school with her class and teacher.
(On a side note - I didn't cry either - yeah!!!)

When I picked her up from dayhome at the end of the day, she came running up to me exclaiming how much fun school had been and she can't wait to go back, and then she proceeded to talk my ear off all the way home and the whole time I was making dinner about every little thing they did.

Alright, I think she is going to enjoy it - for now - we will re-visit this when she hits high school.

Thursday, September 06, 2012

Spanish Rice & Chicken

I love cookbooks!
My husband might even say I have a cookbook problem, but I call it a collection.
I fell in love with cookbooks back when I was in high school and I still have plenty if not all of my first cookbooks.

The other thing I love is the cookbook magazines you can buy in grocery stores.
My very first ever cookbook magazine was Taste of Home - Oct / Nov 1994 edition.

I read that magazine over and over again - I made so many different recipes from it, most of which were really good.
But as all things go, the old get pushed aside and the new becomes front and centre.

A few weeks ago, I was looking for an old recipe and I stumbled onto this Taste of Home magazine, and as I thumbed through it and remember all those recipes I tried way back as a teenager, I found my dinner idea for the next day.

The last time I made this recipe, I was in high school!

I made a few changes, and both hubby and I really liked it, the kids, ate the chicken and rice but turned their noses up at the peppers as they usually do.
But I know a recipe is really good when I look over and the green peppers have not be picked out by my husband - he inhaled this one!

This is perfect for a fall or winter day - comfort food.


Spanish Rice & Chicken

2-3 pounds bone in chicken pieces (I used drumsticks and thighs)
1 teaspoon garlic powder
1 teaspoon celery salt
1 teaspoon paprika
1 ½ cups chicken broth
3 Roma tomatoes, roughly chopped
1 ½ teaspoons salt
1 ½ teaspoons chili powder
1 cup uncooked rice
1 medium onion, chopped
½ green pepper, chopped
½ yellow pepper, chopped

Preheat oven to 425 F (if you have convection – set to 400 F convection), place chicken in a 9 x 13 casserole dish.  Combine garlic powder, celery salt and paprika; sprinkle evenly over both sides of each chicken piece.  Place in oven and cook uncovered for 20 minutes.

Meanwhile bring chicken broth, tomatoes, salt and chili powder to a boil in a saucepan.

Once chicken has cooked for 20 minutes, add the rice, onion, green and yellow peppers, then pour chicken broth mixture on top, stir a little bit (you might need to move the chicken pieces around to make sure the rice is mixed in).

Cover with a lid or foil and return to oven and continue to bake for an additional 45 minutes or until the chicken is done and the rice is tender.

Enjoy!

Yield: serves 4 adults.
Source: Taste of Home Oct/Nov 1994 edition
 

Tuesday, September 04, 2012

Changing Dayhomes

Last Friday was our last day at our dayhome.
It was a day of mixed feelings.

Anna and Little Girl at her Christmas party in 2009

Sad because we have been with Anna since Little Girl was one and I went back to work.
Sad because she has become part of our family and we love her, the kids love her and she loves our children as though they are her own grandchildren.
 
Happy because Little Girl has aged out of her care (she doesn't do before and after school care).
Happy because we are growing and starting school in a few days.
Happy because we have found another dayhome that I think will be just as good.
Happy because today they started at their new dayhome and went happily and no crying.


Little Boy getting his present from Santa at Anna's annual
Christmas party. (2009

Little Girl and Santa (2009)
 
Do you use a dayhome for your children?  Have you been a fortunate as we have to have found someone that has become an extension of your family?

Monday, September 03, 2012

Pura-Kiki BPA-Free Baby Bottles GIVEAWAY #babygifts

Right around the time Little Boy was born, the whole BPA in plastics scare happened, so now I had a cupboard full of bottles and sippy cups that were unsafe.  As companies scrambled to develop products that were BPA-Free, so did parents like me scramble to the stores to find these products.

One fantastic product that is out now is stainless steel bottles and Pura-Kiki has some wonderful bottles and sippy cups.

Infant & Toddler Bottles that Adapt to the Needs of your Child: The Kiki is the only 100% plastic free bottle on the market and the feeding system grows with your child - turning from a bottle with slow-flow silicone nipple to a medium-flow bottle and then ultimately a spill-proof sippy bottle with sip spout. And, if your child has a strong preference for another manufacturer's nipple or spout, our bottle will probably work with those as well.

Made of safe, food-grade stainless steel
No Internal Liner
Non-toxic and truly 100% BPA-free


The prize is a $100 prize pack of Pura Kiki Stainless Steel bottles!

This giveaway run until September 24, 2012 at 12:01am EST and is open to both US and Canada.

Please use the Rafflecopter below to enter:

a Rafflecopter giveaway

Thank you to A Hen's Nest for organizing this fun giveaway!

Saturday, September 01, 2012

PRK Baby Food & Drink Organizer GIVEAWAY #babygifts

I really wish I had taken a picture of what our bottle and sippy cupboard looked like back when we were using both of those for 2 kids.
Can we say messy and missing pieces all the time?

PRK Products had a wonderful solution. 


Maximize cabinet space and tame the chaos in kitchen cabinets with efficient baby food and beverage container organizers from PRK™ Products. No more multiple parts of bottles and sippy cups taking up valuable kitchen space, the Universal Baby Bottle & Sippy Cup Organizer keeps all the parts in one tidy place. The Universal Baby Food Jar Organizer stores 16 jars and even acts as a shelf, allowing for other items to be stacked on top of it. PRK™ Products are dishwasher safe, BPA and phthalate free and can be stored in the pantry, fridge or freezer (great for store bought or homemade baby food).  


The prize is a set of 1 Universal Baby Bottle & Sippy Cup Organizer and 1 Universal Baby Food Jar Organizer (ARV $59.99)

This giveaway runs until September 24, 2012 at 12:01am EST and is open to both US and Canada.

Please use the Rafflecopter below to enter:

a Rafflecopter giveaway

Thank you to A Hen's Nest for organizing this fun giveaway!

Friday, August 31, 2012

School Lunch Ideas

Little Girl starts school is just under a week, Kindergarten for her is all day Tuesday, Thursday and Friday afternoon – so that means, 2 times a week she gets to bring her lunch.
This also means 2 times a week, I get to make her lunch.

Check out what I found for her:

Thermos brand - found at Superstore.

When I was in grade school and taking my lunch, my parents never made my lunch – all 4 of us kids made our own lunch.

I know this is what some “experts” say helps kids eat their lunch – having them make it themselves – and I do agree it helps kids put in the foods they are likely to eat, but I think instead the child should be involved in the process, but not completely responsible for the whole lunch.

And honestly, I have no problem making her lunch – I am actually excited and looking forward to it – so much so that I have been pinning blog posts and blogs with school lunch ideas since early spring.

But last week I asked Little Girl what kind of food she would like to bring; you want to know what her first response was?
“Peanuts!”

Seriously? Peanuts?  The only thing she is not allowed to bring – contraband peanuts, she wants to bring?

So after explaining to her about allergies and how no peanuts were allowed in the schools, etc, etc. she came up with some ideas:
-          Ham & cheese wrap
-          Pickles
-          Carrots (from my garden)
-          Granola bar
-          Fishy crackers


I am in love with the Bento lunch idea (the simple ones that look like this):

Source: Bent on Better Lunches
 
Not the crazy ones that look like this:

Cute, but someone has way too much time on their hands.
 
Here are some of my ideas for school lunches:

-          Banana bread
-          Mini muffins
-          Hard boiled egg
-          Crackers & cheese
-          Gold fish crackers
-          Pretzels
-          Pickles
-          Cheese string
-          Rice cakes
-          Pepperoni
-          Yogurt raisins
-          Raisins
-          Popcorn
-          Granola bars
     
Entrees:
-          Cold chicken fingers
-          Cold grilled cheese
-          Cold perogies
-          Wraps
-          Rolled up deli meat
-          Pasta
-          Soup with crackers
-          Bocconcini & tomato salad
-          Quesadilla
-          Mini quiche
-          Mini frittata
 
Fruit
-          Apple slices
-          Strawberries
-          Grapes
-          Cantaloupe
-          Pineapple
-          Orange slices
-          Mandarin orange
-          Fruit salad
-          Fruit kabobs (on toothpicks or straws for little kids)
-          Apple sauce

Veggies
-          Cucumber slices
-          Cherry tomatoes
-          Carrot sticks
-          Red pepper slices
-          Steamed broccoli (cold)
-          Snap peas
-          Hummus and veggies to dip


Are you making school lunches this year, or do you have a few years under your belt already?  Have any ideas for me?